

Spring is the latest application development framework for enterprise Java. Millions of developers use Spring Framework to create applications that are easily testable, perform well,with reusable code.
Spring framework is an open source Java platform and it was initially written by Rod Johnson and was first released under the Apache license in June 2003.
Spring is lightweight i.e in size. The basic version of spring is around 2MB.
The Spring Framework can be used in developing any Java application, but there are extensions for building web applications on top of the Java EE platform.
Benefits of Using Spring Framework:
• Spring enables developers to develop enterprise applications by using POJOs. By using POJOs you do not need an EJB container product such as an application server but you have the option of using only a robust servlet container such as Tomcat or some commercial product.
• Spring is organized in a modular fashion. Even the number of packages and classes are substitutes, you have to think about ones you need and ignore the rest.
• Spring truly makes use of some of the existing technologies like several ORM frameworks, logging frameworks, JEE, Quartz and JDK timers, other view technologies.
• Testing an application written with Spring is simple because environment-dependent code is moved into the framework. Also, by using JavaBean-style POJOs, it makes easy to use dependency injection for injecting test data.
• The web framework is a well-designed web MVC framework, which provides a great alternative to web frameworks such as Struts or other over engineered or less popular web frameworks.
• Spring provides a suitable API to convert technology-specific exceptions (thrown by JDBC, Hibernate, or JDO, for example) into consistent, unchecked exceptions.
• Lightweight IoC containers tend to be lightweight,also when compared to EJB containers. This is good for creating and deploying applications on computers with limited memory and CPU resources.
• Spring gives a consistent transaction management interface that can scale down to a local transaction (using a single database, for example) and scale up to global transactions (using JTA, for example).
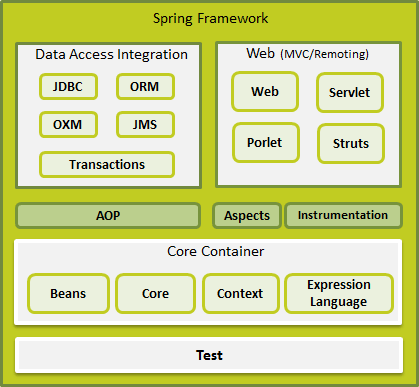
Spring Framework Architecture
Spring could potentially be a one-stop shop for all your enterprise applications, but also, Spring is modular, that allows you to pick and choose any module that suits you best, without waiting in the rest.
Spring Framework released about 20 modules which can be used based on an application requirement.
Spring framework is an open source Java platform and it was initially written by Rod Johnson and was first released under the Apache license in June 2003.
Spring is lightweight i.e in size. The basic version of spring is around 2MB.
The Spring Framework can be used in developing any Java application, but there are extensions for building web applications on top of the Java EE platform.
Benefits of Using Spring Framework:
• Spring enables developers to develop enterprise applications by using POJOs. By using POJOs you do not need an EJB container product such as an application server but you have the option of using only a robust servlet container such as Tomcat or some commercial product.
• Spring is organized in a modular fashion. Even the number of packages and classes are substitutes, you have to think about ones you need and ignore the rest.
• Spring truly makes use of some of the existing technologies like several ORM frameworks, logging frameworks, JEE, Quartz and JDK timers, other view technologies.
• Testing an application written with Spring is simple because environment-dependent code is moved into the framework. Also, by using JavaBean-style POJOs, it makes easy to use dependency injection for injecting test data.
• The web framework is a well-designed web MVC framework, which provides a great alternative to web frameworks such as Struts or other over engineered or less popular web frameworks.
• Spring provides a suitable API to convert technology-specific exceptions (thrown by JDBC, Hibernate, or JDO, for example) into consistent, unchecked exceptions.
• Lightweight IoC containers tend to be lightweight,also when compared to EJB containers. This is good for creating and deploying applications on computers with limited memory and CPU resources.
• Spring gives a consistent transaction management interface that can scale down to a local transaction (using a single database, for example) and scale up to global transactions (using JTA, for example).
Spring Framework Architecture
Spring could potentially be a one-stop shop for all your enterprise applications, but also, Spring is modular, that allows you to pick and choose any module that suits you best, without waiting in the rest.
Spring Framework released about 20 modules which can be used based on an application requirement.
Spring Environment Setup
I assume you already have setup for Java Development Kit (JDK) and Eclipse. So let’s see how we setup Spring Framework libraries:
These are the simple steps through which you can download and install the framework on your machine.
• Make a choice whether you want to install Spring on which operating system Windows, or Unix and then download .zip file for windows and .tz file for Unix.
• Download the latest version of Spring framework binaries from www.springsource.org/download.
• At the time of writing this tutorial, I downloaded spring-framework-3.1.0.M2.zip and it will give you directory structure inside C:\spring-framework-3.1.0.M2 as follows.
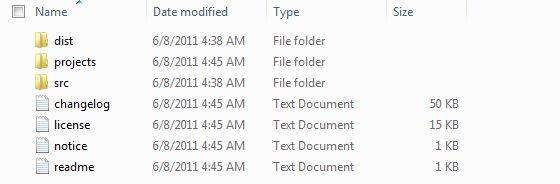
You will find all the Spring libraries in the directory C:\spring-framework-3.1.0.M2\dist. So you should set your CLASSPATH variable on this directory properly otherwise you will face problem while running your application.
Let us start actual programming with Spring Framework.I also assume that you have a little bit working knowledge with Eclipse IDE.
So let’s write a basic Spring Application which will print "Hello World!".
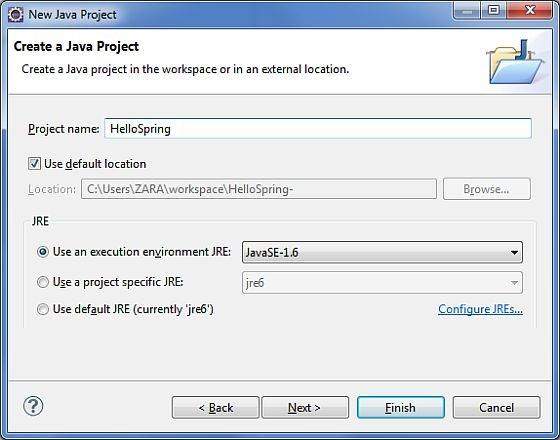
Step 1 - Create Java Project:
The first step is to create a simple Java Project using Eclipse IDE. Follow the option File -> New -> Project and finally select Java Project wizard from the wizard list. Then name this project asHelloSpring using the wizard window as follows:
Let us start actual programming with Spring Framework.I also assume that you have a little bit working knowledge with Eclipse IDE.
So let’s write a basic Spring Application which will print "Hello World!".
Step 1 - Create Java Project:
The first step is to create a simple Java Project using Eclipse IDE. Follow the option File -> New -> Project and finally select Java Project wizard from the wizard list. Then name this project asHelloSpring using the wizard window as follows:
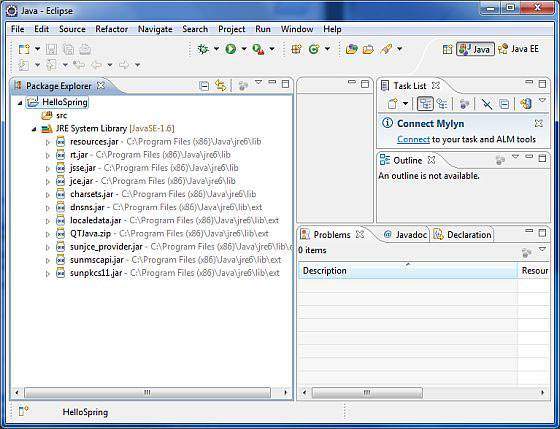
Once your project is created, you will have following stuff in your Project Explorer:
Step 2 - Add Required Libraries:
As a second step let us add Spring Framework and common logging API libraries in our project. Now right click on the project name HelloSpring and then follow the following option available in context menu: Build Path -> Configure Build Path to display the Java Build Path window as follows:
As a second step let us add Spring Framework and common logging API libraries in our project. Now right click on the project name HelloSpring and then follow the following option available in context menu: Build Path -> Configure Build Path to display the Java Build Path window as follows:
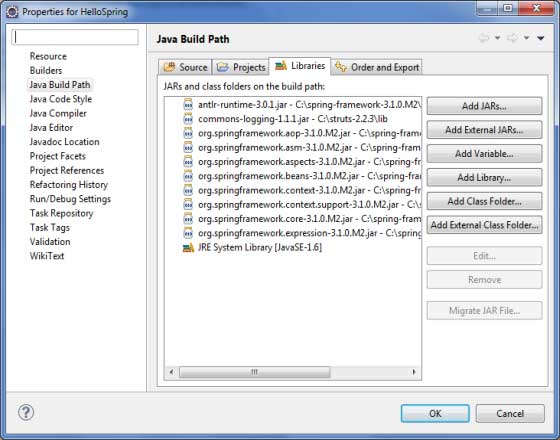
Now click on Add External JARs button to add the following core JARs from Spring Framework and Common Logging installation directories:
• antlr-runtime-3.0.1
• org.springframework.aop-3.1.0.M2
• org.springframework.asm-3.1.0.M2
• org.springframework.aspects-3.1.0.M2
• org.springframework.beans-3.1.0.M2
• org.springframework.context.support-3.1.0.M2
• org.springframework.context-3.1.0.M2
• org.springframework.core-3.1.0.M2
• org.springframework.expression-3.1.0.M2
• commons-logging-1.1.1
Step 3 - Create Source Files:
Now let us create actual source files under the HelloSpring project. So initially you need to create a package called com.javatutorial. To do this, right click on src in package explorer section and follow the option : New -> Package.
Next we will create HelloWorld.java and MainApp.java files under the com.javatutorial package.
Here is the content of HelloWorld.java:
package com.javatutorial;
public class HelloWorld {
private String message;
public void setMessage(String message){
this.message = message;
}
public void getMessage(){
System.out.println("Your Message : " + message);
}
}
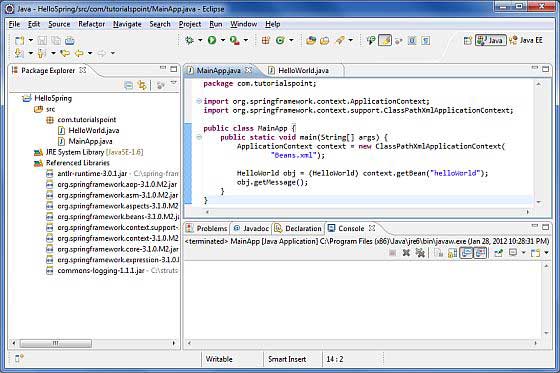
Following is the content of the second file MainApp.java:
package com.javatutorial;
import org.springframework.context.ApplicationContext;
import org.springframework.context.support.ClassPathXmlApplicationContext;
public class MainApp {
public static void main(String[] args) {
ApplicationContext context =
new ClassPathXmlApplicationContext("Beans.xml");
HelloWorld obj = (HelloWorld) context.getBean("helloWorld");
obj.getMessage();
}
}
There are two important points to remember about the main program:
1. First step is to create application context where we used framework APIClassPathXmlApplicationContext(). This API loads beans configuration file and eventually based on the provided API, it also takes care of creating, initializing all the objects i.e beans which are being mentioned in the config file.
2. Second step is used to get required bean using getBean() method of the created context. It uses bean ID to return a generic object which finally can be casted to real object.And if you have object, you can use that object to call any class method.
Step 4 – Now Create Bean Configuration File:
package com.javatutorial;
public class HelloWorld {
private String message;
public void setMessage(String message){
this.message = message;
}
public void getMessage(){
System.out.println("Your Message : " + message);
}
}
Following is the content of the second file MainApp.java:
package com.javatutorial;
import org.springframework.context.ApplicationContext;
import org.springframework.context.support.ClassPathXmlApplicationContext;
public class MainApp {
public static void main(String[] args) {
ApplicationContext context =
new ClassPathXmlApplicationContext("Beans.xml");
HelloWorld obj = (HelloWorld) context.getBean("helloWorld");
obj.getMessage();
}
}
There are two important points to remember about the main program:
1. First step is to create application context where we used framework APIClassPathXmlApplicationContext(). This API loads beans configuration file and eventually based on the provided API, it also takes care of creating, initializing all the objects i.e beans which are being mentioned in the config file.
2. Second step is used to get required bean using getBean() method of the created context. It uses bean ID to return a generic object which finally can be casted to real object.And if you have object, you can use that object to call any class method.
Step 4 – Now Create Bean Configuration File:
You need to create a Bean Configuration file which is an XML file and acts as cement that glues the beans or classes with each other. This file should be created under the src directory as shown below:
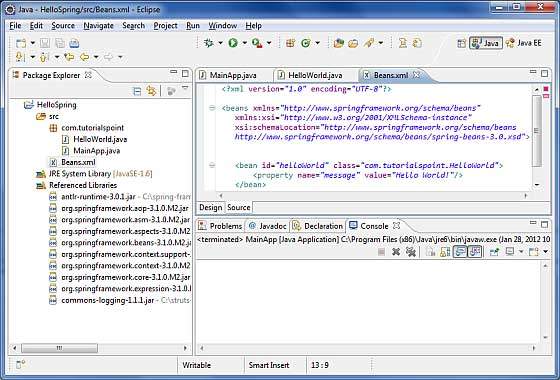
Usually developers name this file as Beans.xml, but can choose any name. You have to make sure that this file is available in CLASSPATH and use the same name in main application while creating application context as shown above in MainApp.java file.
The Beans.xml is used to assign unique IDs to different beans and to control the creation of objects with different values without impacting any of the Spring source files. Ex:- using below file you can pass any value for "message" variable and so you can print different values of message without having any effect on HelloWorld.java and MainApp.java files. Let’s see how it works:
<?xml version="1.0" encoding="UTF-8"?>
<beans xmlns="http://www.springframework.org/schema/beans"
xmlns:xsi="http://www.w3.org/2001/XMLSchema-instance"
xsi:schemaLocation="http://www.springframework.org/schema/beans
http://www.springframework.org/schema/beans/spring-beans-3.0.xsd">
<bean id="helloWorld" class="com.javatutorial.HelloWorld">
<property name="message" value="Hello World!"/>
</bean>
</beans>
When Spring application gets loaded into the memory, Framework uses the above configuration file to create all the beans defined and assign them a unique ID as defined in <bean>tag. You can use <property> tag to pass the values of different variables used at the time of object creation.
Step 5 - Running the Program:
Once you are done with creating source and beans configuration files, Now you can compile and run your program. So, Keep MainApp.Java file tab active and use eitherRun option available in the Eclipse IDE or use Ctrl + F11 to compile and run your MainApp application.this will print in Eclipse IDE's console:
Your Message : Hello World!
Congratulations, you have created your first Spring Application. You see the above said flexibility of above Spring application by changing the value of "message" property and keeping both the source files unchanged.
Spring IoC Containers
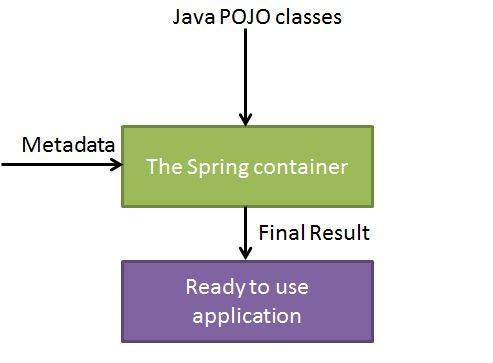
The Spring container is at the core of the Spring Framework. Also the container creates objects, wire them together, configure them, and manage their complete lifecycle from beginning to the end or creation till destruction. This also uses dependency injection (DI) to manage the components that make up an application. So, objects are called Spring Beans.
The container gets its instructions on what objects should instantiate, configure, and assemble by reading metadata configuration provided. The configured metadata can be represented by XML, Java annotations, or Java code. The Spring IoC container uses Java POJO classes and configuration metadata to produce a fully configured and executable system or application.
The Beans.xml is used to assign unique IDs to different beans and to control the creation of objects with different values without impacting any of the Spring source files. Ex:- using below file you can pass any value for "message" variable and so you can print different values of message without having any effect on HelloWorld.java and MainApp.java files. Let’s see how it works:
<?xml version="1.0" encoding="UTF-8"?>
<beans xmlns="http://www.springframework.org/schema/beans"
xmlns:xsi="http://www.w3.org/2001/XMLSchema-instance"
xsi:schemaLocation="http://www.springframework.org/schema/beans
http://www.springframework.org/schema/beans/spring-beans-3.0.xsd">
<bean id="helloWorld" class="com.javatutorial.HelloWorld">
<property name="message" value="Hello World!"/>
</bean>
</beans>
When Spring application gets loaded into the memory, Framework uses the above configuration file to create all the beans defined and assign them a unique ID as defined in <bean>tag. You can use <property> tag to pass the values of different variables used at the time of object creation.
Step 5 - Running the Program:
Once you are done with creating source and beans configuration files, Now you can compile and run your program. So, Keep MainApp.Java file tab active and use eitherRun option available in the Eclipse IDE or use Ctrl + F11 to compile and run your MainApp application.this will print in Eclipse IDE's console:
Your Message : Hello World!
Congratulations, you have created your first Spring Application. You see the above said flexibility of above Spring application by changing the value of "message" property and keeping both the source files unchanged.
Spring IoC Containers
The Spring container is at the core of the Spring Framework. Also the container creates objects, wire them together, configure them, and manage their complete lifecycle from beginning to the end or creation till destruction. This also uses dependency injection (DI) to manage the components that make up an application. So, objects are called Spring Beans.
The container gets its instructions on what objects should instantiate, configure, and assemble by reading metadata configuration provided. The configured metadata can be represented by XML, Java annotations, or Java code. The Spring IoC container uses Java POJO classes and configuration metadata to produce a fully configured and executable system or application.
Spring provides
following two different types of containers.
S.N.
|
Container
& Description
|
1
|
Spring BeanFactory Container
This is the simplest container
providing basic support for DI and defined by theorg.springframework.beans.factory.BeanFactory interface.
The BeanFactory , related
interfaces, like BeanFactoryAware, InitializingBean, are also present in
Spring till now,for the purposes of backward compatibility with the large
number of third-party frameworks that integrate with Spring.
|
2
|
Spring ApplicationContext
Container
This container adds more
enterprise-specific functionality such as the ability to resolve textual
messages from a properties file and the ability to publish application events
to interested event listeners. This container is defined by the org.springframework.context.ApplicationContextinterface.
|
The ApplicationContext container
includes all functionality of the BeanFactory container, so this
normally recommended over the BeanFactory. BeanFactory can also
used for light weight applications like mobile devices or applet based
applications where data volume and speed is significant.
Spring Bean Definition
The objects that form
the backbone of your application and that are managed by the Spring IoC
container are called beans. The bean is, an object that is instantiated,
assembled, and managed by a Spring IoC container. These beans are created with
the configuration metadata that you supply to the container, for example, in
the form of XML <bean/> definitions which you have already seen in
previous chapters.
The bean definition consists
of the information called configuration metadata which is needed for
the container to know the followings:
·
How
to create a bean
·
Bean's
lifecycle details
·
Bean's
dependencies
The above configuration
metadata converts into a set of the following properties that make up each bean
definition.
Properties
|
Description
|
class
|
This attribute is necessary and
specify the bean class to be used to create the bean.
|
name
|
This attribute specifies the bean
identifier in unique way. In XML-based config metadata, we use the id and/or
name attributes to specify the bean identifier(s).
|
scope
|
This attribute specifies the scope
of the objects created from a particular bean definition and it will be
discussed in bean scopes chapter.
|
initialization mode
|
A lazy-initialized bean tells the
IoC container to create a bean instance when it is first requested, rather
than at startup.
|
initialization method
|
A callback to be called just after
all necessary properties on the bean have been set by the container.
|
destruction method
|
A callback to be used when the
container containing the bean is destroyed.
|
Spring Configuration Metadata
Spring IoC container is
totally decoupled from the format in which this configuration metadata is really
written. There are three important methods to provide configuration metadata to
the Spring Container:
1. XML based configuration file.
2. Annotation-based configuration
3. Java-based configuration
You already have seen
how XML based configuration metadata provided to the container, but let’s see one
more sample of XML based configuration file with different bean definitions
including lazy initialization & initialization and destruction method:
<?xml version="1.0"
encoding="UTF-8"?>
<beans
xmlns="http://www.springframework.org/schema/beans"
xmlns:xsi="http://www.w3.org/2001/XMLSchema-instance"
xsi:schemaLocation="http://www.springframework.org/schema/beans
http://www.springframework.org/schema/beans/spring-beans-3.0.xsd">
<!--
A simple bean definition -->
<bean id="..." class="...">
<!-- collaborators and configuration for this bean go here -->
</bean>
<!--
A bean definition with lazy init set on -->
<bean id="..." class="..."
lazy-init="true">
<!-- collaborators and configuration for this bean go here -->
</bean>
<!--
A bean definition with initialization method -->
<bean id="..." class="..."
init-method="...">
<!-- collaborators and configuration for this bean go here -->
</bean>
<!--
A bean definition with destruction method -->
<bean id="..." class="..."
destroy-method="...">
<!-- collaborators and configuration for this bean go here -->
</bean>
<!--
more bean definitions go here -->
</beans>
Spring Bean Scopes
When defining a
<bean> in Spring, we also have the option of declaring a scope for that
bean. Ex:- To force Spring to produce a new bean instance each time one is required,
you must declare the bean's scope attribute as prototype. Similarly if we
want Spring to return the same bean instance each time one is required, you
should declare the bean's scope attribute as singleton.
The Spring Framework
supports five scopes as folllows, three of which are available only if you use
a web-aware ApplicationContext.
Scope
|
Description
|
singleton
|
This scopes the bean definition to
a single instance per Spring IoC container (default).
|
prototype
|
This scopes a single bean
definition to have any number of object instances.
|
request
|
This scopes a bean definition to
an HTTP request. valid only in the context of a web-aware Spring
ApplicationContext.
|
session
|
This scopes a bean definition to
an HTTP session. valid just in the context of a web-aware Spring
ApplicationContext.
|
global-session
|
This scopes a bean definition to a
global HTTP session. Only valid in the context of a web-aware Spring
ApplicationContext.
|
Spring Bean Life Cycle
The life cycle of a
Spring bean is easy to understand. Whenever a bean is instantiated, it may be required
to perform some initialization to get it ,as usable. In similar way, when bean
is no longer needed and is removed from that container, some cleanup may be needed.
There is lists of the
activities that take place behind the scenes between the time of bean
Instantiation and its destruction, but this chapter will discuss only two
important bean lifecycle callback methods which are required at the time of
bean initialization and its destruction.
To define setup and
teardown for a bean, we simply declare the <bean>
with init-method and/ordestroy-method parameters. The
init-method attribute specifies a method that is to be called on the bean
immediately upon instantiation. Similarly, destroy-method specifies a method
that is called just before a bean is removed from the container.
Initialization callbacks:
The org.springframework.beans.factory.InitializingBean interface
specifies a single method:
void afterPropertiesSet() throws Exception;
So you can simply
implement above interface and initialization work can be done inside
afterPropertiesSet() method as follows:
public class ExampleBean implements
InitializingBean {
public
void afterPropertiesSet() {
//
do some initialization work
}
}
In the case of XML-based
configuration metadata, you can use the init-method attribute to
specify the name of the method that has a void no-argument signature. For
example:
<bean id="exampleBean"
class="examples.ExampleBean" init-method="init"/>
Following is the class
definition:
public class ExampleBean {
public
void init() {
//
do some initialization work
}
}
Destruction callbacks
The org.springframework.beans.factory.DisposableBean interface
specifies a single method:
void destroy() throws Exception;
you can implement above
interface and finalization work can be done inside destroy() method as follows:
public class ExampleBean implements
DisposableBean {
public
void destroy() {
//
do some destruction work
}
}
In the case of XML-based
configuration metadata,we also can use the destroy-method attribute
to specify the name of the method that has a void no-argument signature. For
example:
<bean id="exampleBean"
class="examples.ExampleBean"
destroy-method="destroy"/>
Following is the class
definition:
public class ExampleBean {
public
void destroy() {
//
do some destruction work
}
}
Spring Dependency Injection
Every java based
application has a few objects that work together to present what the end-user
sees as a working application. When writing a Java application, classes must be
as independent as possible of other Java classes to increase the possibility to
reuse these classes and to test them independently of other classes while doing
unit testing. Dependency Injection (or sometime called wiring) helps in gluing
these classes together and same time keeping them independent.
Consider you have an
application which has a text editor component and you want to provide spell
checking. The code would look something like this:
public class TextEditor {
private
SpellChecker spellChecker;
public
TextEditor() {
spellChecker = new SpellChecker();
}
}
What we've done here is
create a dependency between the TextEditor and the SpellChecker. In the control
scenario we would instead do something like this:
public class TextEditor {
private
SpellChecker spellChecker;
public
TextEditor(SpellChecker spellChecker) {
this.spellChecker = spellChecker;
}
}
Here TextEditor should
not worry about SpellChecker implementation. The SpellChecker should be
implemented in an independent manner and will be provided to TextEditor at the
time of TextEditor instantiation and this entire procedure is controlled by the
Spring Framework.
Here, we have removed
the total control from TextEditor and kept it somewhere else (ie. XML
configuration file) and the dependency ( ie. class SpellChecker) is being
injected into the class TextEditor through a Class Constructor. Thus flow
of control has been "inverted" by Dependency Injection (DI) because
you have effectively delegated dependances to some external system.
Another method for
injecting dependency is through Setter Methods of TextEditor class
where we will create SpellChecker instance and this instance will be used to
call setter methods to initialize TextEditor's properties.
Thus, DI exists in two
major variants and following two sub-chapters will cover both of them with
examples:
S.N.
|
Dependency
Injection Type & Description
|
1
|
The Constructor-based dependency
injection
The Constructor-based DI is implemented
when container invokes a class constructor with a number of arguments, each
representing a dependency on other class.
|
2
|
Setter-based dependency injection
Setter-based DI is implemented by container
calling setter methods on your beans after invoking a no-argument constructor
or no-argument static factory method to instantiate your bean.
|
Event Handling in Spring
You have seen in all the
chapters that core of Spring is the ApplicationContext, which controls entire
life cycle of the beans. The ApplicationContext updates certain types of events
during loading of beans. Ex:- a ContextStartedEvent is
published when the context is started andContextStoppedEvent is
published when the context is stopped.
Event handling in
the ApplicationContext is provided through the ApplicationEvent class
andApplicationListener interface. So if a bean implements the ApplicationListener,
now each time anApplicationEvent gets updated to the
ApplicationContext, the bean notified.
Spring gives these standard
events:
S.N.
|
Spring
Built-in Events & Description
|
1
|
ContextRefreshedEvent
This event is published when
the ApplicationContext is either initialized or refreshed. It
also be raised using the refresh() method on the ConfigurableApplicationContext interface.
|
2
|
ContextStartedEvent
This event is published when
the ApplicationContext is started using the start() method
on theConfigurableApplicationContext interface. You can poll your
database or you can re/start any stopped application after receiving this
event.
|
3
|
ContextStoppedEvent
This event is published when
the ApplicationContext is stopped using the stop() method on
the ConfigurableApplicationContext interface. You can do
required housekeep work after receiving this event.
|
4
|
ContextClosedEvent
This event is published when
the ApplicationContext is closed using the close() method on
theConfigurableApplicationContext interface. A closed context
reaches its end of life; it cannot be refreshed or restarted.
|
RequestHandledEvent
|
Spring's event handling
is single-threaded so if an event is published, until all receivers get the
message, the processes are jammed and the flow will not continue. That’s why,
care must be taken when designing your application if event handling is to be
used.
Listening to Context Events:
To listen a context
event, a bean should implement the ApplicationListener interface
which has just one method onApplicationEvent(). So let’s write an example
to check how the events propagates and how you can put your code to do required
task based on certain events.
Let’s have Eclipse IDE and
follow the following steps to create a Spring application:
Step
|
Description
|
1
|
Create a project with a name SpringExample and
create a package com.javatutorial under the src folder
in the created project.
|
2
|
Add required Spring libraries
using Add External JARs option as explained in the Spring
Hello World Example chapter.
|
3
|
Create Java classes HelloWorld, CStartEventHandler, CStopEventHandler and MainAppunder
the com.javatutorial package.
|
4
|
Create Beans config file Beans.xml under
the src folder.
|
5
|
The final step is to create the
content of all the Java files and Bean Configuration file and run the
application as explained below.
|
Here is content
of HelloWorld.java:
package com.tutorialspoint;
public class HelloWorld {
private
String message;
public
void setMessage(String message){
this.message = message;
}
public
void getMessage(){
System.out.println("Your Message : " + message);
}
}
Following is the content
of the CStartEventHandler.java file:
package com.tutorialspoint;
import org.springframework.context.ApplicationListener;
import
org.springframework.context.event.ContextStartedEvent;
public class CStartEventHandler
implements ApplicationListener<ContextStartedEvent>{
public
void onApplicationEvent(ContextStartedEvent event) {
System.out.println("ContextStartedEvent
Received");
}
}
Following is the content
of the CStopEventHandler.java file:
package com.tutorialspoint;
import
org.springframework.context.ApplicationListener;
import
org.springframework.context.event.ContextStoppedEvent;
public class CStopEventHandler
implements ApplicationListener<ContextStoppedEvent>{
public
void onApplicationEvent(ContextStoppedEvent event) {
System.out.println("ContextStoppedEvent Received");
}
}
Following is the content
of the MainApp.java file:
package com.tutorialspoint;
import
org.springframework.context.ConfigurableApplicationContext;
import
org.springframework.context.support.ClassPathXmlApplicationContext;
public class MainApp {
public
static void main(String[] args) {
ConfigurableApplicationContext context =
new
ClassPathXmlApplicationContext("Beans.xml");
//
Let us raise a start event.
context.start();
HelloWorld obj = (HelloWorld) context.getBean("helloWorld");
obj.getMessage();
//
Let us raise a stop event.
context.stop();
}
}
Following is the
configuration file Beans.xml:
<?xml version="1.0"
encoding="UTF-8"?>
<beans
xmlns="http://www.springframework.org/schema/beans"
xmlns:xsi="http://www.w3.org/2001/XMLSchema-instance"
xsi:schemaLocation="http://www.springframework.org/schema/beans
http://www.springframework.org/schema/beans/spring-beans-3.0.xsd">
<bean id="helloWorld"
class="com.tutorialspoint.HelloWorld">
<property name="message" value="Hello
World!"/>
</bean>
<bean id="cStartEventHandler"
class="com.tutorialspoint.CStartEventHandler"/>
<bean id="cStopEventHandler"
class="com.tutorialspoint.CStopEventHandler"/>
</beans>
Once you are done with
creating source and bean configuration files, now run the application. If
everything is fine it will print the following message:
ContextStartedEvent Received
Your Message : Hello World!
ContextStoppedEvent Received
AOP with Spring Framework
One of the key
components of Spring Framework is the Aspect oriented programming framework.
AOP entails breaking down program logic into distinct parts called so-called
earlier. The functions that not only span multiple points of an application are
called cross-cutting concerns and these cross-cutting concerns are
conceptually separate from the application's business logic. There are also
other various good examples of aspects like logging, auditing, declarative
transactions, security, and caching etc.
The key unit of
modularity in OOP is the class,while in AOP the unit of modularity is the thing.
Dependency Injection makes you decouple your application objects from each
other and AOP helps you decouple cross-cutting concerns from the objects that
they affect.
Spring AOP module gives
interceptors to intercept an application, ex:- when a method is executed, you
can add extra functionality before or after the method execution.
AOP Terminologies:
These terms are not
specific to Spring, but they belongs to AOP.
Terms
|
Description
|
Aspect
|
A module which has a set of APIs
providing cross-cutting requirements. Ex:- the logging module would be called
AOP aspect for logging.
|
Join point
|
This represents a point in your
application where you can plug-in AOP aspect. You can say, it is the actual
place in the application where an action will be taken using Spring AOP
framework.
|
Advice
|
This is the actual action to be
taken either before or after the method execution. This is actual piece of
code that is invoked during program execution by Spring AOP framework.
|
Pointcut
|
This is a set of one or more
joinpoints where an advice should be executed. You can specify pointcuts
using expressions or patterns as we will see in our AOP examples.
|
Introduction
|
An introduction allows you to add
new methods or attributes to existing classes.
|
Target object
|
The object being advised by one or
more aspects, this object will always be a proxied object. Also referred to
as the advised object.
|
Weaving
|
Weaving is the process of linking
aspects with other application types or objects to create an advised object.
This can be done at compile time, load time, or at runtime.
|
Types of Advice
Spring aspects can work
with five kinds of advice mentioned below:
Advice
|
Description
|
before
|
Run advice before the a method
execution.
|
after
|
Run advice after the a method
execution regardless of its outcome.
|
after-returning
|
Run advice after the a method
execution only if method completes successfully.
|
after-throwing
|
Run advice after the a method
execution only if method exits by throwing an exception.
|
around
|
Run advice before and after the
advised method is invoked.
|
Custom Aspects Implementation
Spring supports
the @AspectJ annotation style approach and
the schema-based approach to implement custom aspects. The two aspects
have been explained in detail in the following two sub chapters
Approach
|
Description
|
XML Schema based
|
Aspects are implemented using
regular classes along with XML based configuration.
|
@AspectJ based
|
@AspectJ known as a style of
declaring aspects as regular Java classes annotated with Java 5 annotations.
|
JDBC Framework Overview
While working with
database using plain old JDBC. While the Spring JDBC Framework takes care of
all low-level details starting from opening the connection, execute the SQL
statement, also process exceptions and handle transactions, finally close the
connection.
So you should just
define connection parameters and specify the SQL statement to be executed and
do the required work for each iteration while fetching data from the database.
Spring JDBC provides
several approaches and correspondingly different classes to interface with the
database. We will take the most popular approach which makes use
of JdbcTemplateclass of the framework.It is the central framework class
that manages all the database communication and exception handling.
JdbcTemplate Class
The JdbcTemplate class
executes SQL queries, update statements performs iteration over ResultSets and
extraction of returned parameter values. This catches JDBC exceptions and translates them to
the generic exception hierarchy as in the org.springframework.dao package.
Instances of the JdbcTemplate class
are threadsafe once if configured. So you can also configure a
single instance of a JdbcTemplate and then safely inject this
shared reference into multiple DAOs.
when using the
JdbcTemplate class is to configure a DataSource in your Spring
configuration file, and then dependency-inject that shared DataSource bean into
your DAO classes, and the JdbcTemplate is created in the setter for the
DataSource.
Configuring Data Source
Let’s create a database
table Student in our database TEST. Let’s use MySQL database and
if you are working with any other database then you can change your DDL and SQL
queries accordingly.
CREATE TABLE Student(
ID INT NOT NULL AUTO_INCREMENT,
NAME
VARCHAR(20) NOT NULL,
AGE INT NOT NULL,
PRIMARY
KEY (ID)
);
Now we need to supply a
DataSource to the JdbcTemplate so it can configure itself to get database access.
We can also configure the DataSource in the XML file with a piece of code as
shown below:
<bean id="dataSource"
class="org.springframework.jdbc.datasource.DriverManagerDataSource">
<property name="driverClassName"
value="com.mysql.jdbc.Driver"/>
<property name="url"
value="jdbc:mysql://localhost:3306/TEST"/>
<property name="username" value="root"/>
<property name="password" value="password"/>
</bean>
Data Access Object (DAO)
DAO stands for data
access object which is commonly used for database interaction. DAOs is used to
read and write data to the database and they should expose this functionality
through an interface by which the rest of the application will access them.
The Data Access Object
(DAO) support in Spring makes it easy to work with data access technologies
like JDBC, Hibernate, JPA or JDO in a consistent way.
Executing SQL statements
Let us see how we can
perform CRUD (Create, Read, Update and Delete) operation on database tables
using SQL and jdbcTemplate object.
Querying for an integer:
String SQL = "select count(*) from
Student";
int rowCount = jdbcTemplateObject.queryForInt(
SQL );
Querying for a long:
String SQL = "select count(*) from
Student";
long rowCount = jdbcTemplateObject.queryForLong(
SQL );
A simple query using a
bind variable:
String SQL = "select age from Student where
id = ?";
int age = jdbcTemplateObject.queryForInt(SQL,
new Object[]{10});
Querying for a String:
String SQL = "select name from Student
where id = ?";
String name = jdbcTemplateObject.queryForObject(SQL,
new Object[]{10}, String.class);
Querying and returning
an object:
String SQL = "select * from Student where
id = ?";
Student student =
jdbcTemplateObject.queryForObject(SQL,
new Object[]{10}, new StudentMapper());
public class StudentMapper implements
RowMapper<Student> {
public
Student mapRow(ResultSet rs, int rowNum) throws SQLException {
Student student = new Student();
student.setID(rs.getInt("id"));
student.setName(rs.getString("name"));
student.setAge(rs.getInt("age"));
return student;
}
}
Querying and returning
multiple objects:
String SQL = "select * from Student";
List<Student> students =
jdbcTemplateObject.query(SQL,
new StudentMapper());
public class StudentMapper implements
RowMapper<Student> {
public
Student mapRow(ResultSet rs, int rowNum) throws SQLException {
Student student = new Student();
student.setID(rs.getInt("id"));
student.setName(rs.getString("name"));
student.setAge(rs.getInt("age"));
return student;
}
}
Inserting a row into the
table:
String SQL = "insert into Student (name,
age) values (?, ?)";
jdbcTemplateObject.update( SQL, new
Object[]{"Zara", 11} );
Updating a row into the
table:
String SQL = "update Student set name = ?
where id = ?";
jdbcTemplateObject.update( SQL, new
Object[]{"Zara", 10} );
Deletng a row from the
table:
String SQL = "delete Student where id =
?";
jdbcTemplateObject.update( SQL, new Object[]{20}
);
Executing DDL Statements
You can use
the execute(..) method from jdbcTemplate to execute
any SQL statements. This is an example to use CREATE statement to create a
table:
String SQL = "CREATE TABLE Student( "
+
"ID INT NOT NULL
AUTO_INCREMENT, " +
"NAME VARCHAR(20) NOT NULL, " +
"AGE INT NOT NULL, " +
"PRIMARY KEY (ID));"
jdbcTemplateObject.execute( SQL );


this blog is very use full for everyone which student prepared java............nice and awesome blogs
ReplyDeleteThanks dear for sharing
Govind Ballabh